Monday, May 31, 2010

Saying Thanks

Hey Peoples!  Today, I'd like to take a moment to thank all the men and women who have served or continue to serve our country.  I can't image living without the freedoms these men and women have sacrificed so much of their lives for!! AND, a big thank you to their family members!! It is only with your support and sacrifice, that I know these men and women are able to do their job!!

Since the theme of today is THANKS, I thought I'd share a quick thank you that I made for my youngest DS's  piano teacher.  Mr. H teaches music at my kiddo's school.  He is truly amazing, as he has grades
K-12 that he has to try and reach.  While he divides the choir groups by age (usually K-3, 4-6, 7-8, and high school) it requires incredible teaching talent to be able to work with such diverse abilities and ages. In addition, he gives a few private lessons. Both my boys have been lucky to take lessons from him. 


Now being the organized, on top of things parent that I am, I made this card the night before DS's last piano lesson!  It was incredibly hard to get a picture at night that did not glare off the glitter without fading the embossed "music staff lines." You'll have to take my word on this that it turned out pretty good IRL!!  The Cuttlebug notes were die cut from basic black and real red cardstock.  They were smooshed onto my glue pad and then covered in SU's ultra fine black and red glitter.  The "music staff" lines were embossed using my Scor-Pal.  The Rubber Stampede sentiment was stamped with Versamarker and embossed with red embossing tinsel which tied in PERFECTLY with the glittered notes.

Thanks for dropping by again today!! We are going to take advantage of the GORGEOUS weather and head up to the mountains for a family mountain bike ride.  This will be good for me (other than bruised pride) as I am sooooo out of shape and can't remember the last time I rode!! 

I hope everyone has a safe and CREATIVE day!!


Friday, May 28, 2010

Playing with my Crayons

Happy Friday Peoples!! We are down to 7 more days until school is out and boy!! Are things ever crazy here!! 

Friday also means it is time for the Just for Fun® Friday Color Challenge.  This week Sandy gave us the following colors:

Believe it or not, I did not make anything NEAR the idea I had floating in my head!! It would seem, that with all the hoopla going on right now, I became a deer in the headlights!! For the life of me, I could not come up with the energy to "go all out" on this week's project.  BUT! I did revisit an old technique that is making the rounds again, thanks to the recent tutorial on SCS on the Encaustic technique.  I do not have any of these waxes (YET!!) but another alternative is the Melted Crayon technique, which is what I used on this card:


I used glossy cardstock for my main image and  melted a mix of orange, red/orange and red crayons for the top of the card.  Black, brown and a touch of orange was used for the "ground". I stamped the Brushed Wildflowers and the Leaf Sprig with Berries with black Stazon ink.  I think my mind is so cluttered with LIFE stuff, I can't figure out how to add embellishments!!  I played around with a couple of different ideas, but the way I stamped the images, the "scene" did not lend itself to having more on it.  So!! CAS it is!! The card base is 6"x 4 3/4". 

The design team would love to have you join us in this challenge!! You don't have to use JFF stamps if you don't have any as of yet (hehe) in your collection!  Just link your creation using Mr. Linky on the JFF blog.  For more inspiration, check out what the other team members came up with!

and

I really appreciate you stopping by again today!  I'm in the middle of several projects that need to be done like NOW!! I'm basically done with the 8th grade gift bags, but debating with myself if I should add some curling ribbon or just let them be.  I've got a card idea layed out for DS to help me make for his piano teacher (for his last lesson tomorrow! AAACCCKKK!!) and I need to make DS's b-day card before Sunday. All of this, of course, is in between laundry, cleaning and all the other yaddayadda that is happening over the next couple of days!!  I'm tellin' ya~~ I REALLY admire those of you who work full time and still pump out all the wonderful creative projects!!

Ok!! Off to tackle another "must do!!)  I hope you all have a CREATIVE weekend!! 

Friday, May 21, 2010

Andy Warhol Inspired Grunge

Happy Friday Peoples!!  This weeks Just For Fun® Color Challenge is brought to us by Rita:


I knew immediately that I wanted to use Music Men with these colors!! But, somewhere in my online cruising, I got the strange idea to do an Andy Warhol type layout.  I messed around with stamping the image on different colors of paper and stamping it on different distressed backgrounds.  After several failed attempts, I decided that I liked the way these two images came out side by side.


I started with a piece of Very Vanilla card stock and did the wrinkle free distress technique. I used Distress Antique Linen and spritzed with Tattered Angels Glimmer Mist in Old Lace and very lightly Tattered Leather.  For the first image, I flipped the stamp over and carefully applied my distress inks in Rusty Hinge and Broken China randomly along the image.  For the second image, I stamped it using Archival Jet Black ink and then sponged Rusty Hinge and Broken China randomly.  As luck would have it, I stamped the images straight and lined up!! What are the odds of that ever happening again?!! snort.  I then lightly sponged the outside edges and distressed using my distressing tool from SU.  I just bought K&Company's Ancestry.com paper pack and found the perfect background paper.  I struggled with different embellishments but in the end decided to keep this CAS (clean and simple) with just the antique colored brads.  The card base is 5 1/2 x 5 1/2" .  Supplies:  Stamps: Music Men from Just for Fun.  Papers: Very Vanilla, K&Company.  Inks: Distress inks in Rusty Hinge, Broken China, Antique Linen.  Accessories:  distressing tool, brads, sponges.

Of course, you'll want to check out what all the other design team members did with these colors!!

And

We'd love to have you play along with us!  Just link your creation (using what ever stamps you'd like!!) to the Just For Fun Blog using Mr. Linky! 

Thanks for dropping by again today!  Remember to take time for some type of creativity in your day!!

Thursday, May 20, 2010

Madagascar Hissing Cockroaches

Hey there peoples!!  I realize that it has been kind of quite in my postings, but believe it or not, I've been busy as a bee creating (and being assistant to creation). 

My oldest son is in 7th grade this year, and his class is responsible for assisting at the 8th grade graduation.  One of their jobs is to put cards/gifts that the graduates receive into large gift bags.  I've been given the job of decorating these bags.  I've been busy modifying graduation cap die cuts and die cutting out letters for names.  Hoping to get this little chore done by this weekend.   I'll post the final project when completed.

I've also been assistant creative director for my youngest DS's latest project.  He had to make a presentation board and sample of an insect.  He chose COCKROACHES (iiiiccccckkkk!!!!).  By chance he was looking at a former teacher's blog on her family's mission trip to Madagascar and saw a picture of a Madagascar Hissing Cockroach.  So, we narrowed down the cockroach category to Madagascar Hissing Cockroaches. 


This is his version of the cockroach....sitting on a "rotted" log (that the child has had sitting on his desk since we had to cut down the broken limbs from trees from the last snow storm). While the Toad cut the Styrofoam egg in half, DS did all the carving of the bands on the body and the paint job. He is very specific in his details.  You can't really tell in this photo, but the top of the cockroach has different shades of orange/red with a touch of yellow so that it would look more like the photos on his board.    What looks like the cockroaches "eyes" are actually the "horns" on the male cockroaches head (more on that later). 


 Here he is in front of his presentation board. It was stated in the directions for the board that if there was typing done, the student was to do it.  Do you have any idea how incredibly frustrating it is to watch a 3rd grader type?!! Actually, I was very impressed at his typing skills.  Not speedy (at all!) but overall, finger placement was correct.  Much better than what I did when I first started typing as a freshman in high school.  It is just amazing how technology has changed our lives. 

We also made the discovery that stamping on presentation boards DOES NOT WORK so well!!! The cardboard grooves does not allow the stamp to connect to a flat surface!! After stamping the title, DS had to go back and fill in all the missing spots with a marker (good thing mom has ink pads and the matching markers, hehe!!)

Now for some FASCINATING facts on the Madagascar Hissing Cockroach (because I KNOW you are just dying to know!! LOL!)

~ The Hissing Cockroach does NOT have wings, which is unusual for cockroaches

~The female gives birth to live young.  She makes a substance around the eggs that makes a cocoon like structure and then holds the eggs in her body.  After giving birth, she will take care of her young for a couple of months

~Hissing cockroaches can grow to be 2-3 inches long (iiicccckkkk!!).  The males have horns on their heads which they use to ram other males in battles. 

~The Hissing cockroach has spiracles in their abdomen that they push air out of to make the hissing sound (versus rubbing their legs together like other insects do to make sound).  This hissing sound is used in battles (winners hiss more than losers), as an alarm and in their mating rituals. 

~They can live 2-5 years. 

~Facts on cockroaches in general:  they are almost indestructible.  They can survive 2 days of freezing, not eat for 3 months and can live through radiation 100 times that which would kill a human (niiiiice). 

OK!! Now that I've given you a lesson on Madagascar Hissing Cockroaches, I need to go back to die cutting letters out for names and work on my project for tomorrow's Just for Fun Color challenge!!

Thanks for dropping by again today!!  Remember to make time for creativity~~even if it is helping your child make cockroaches!! hehe

Friday, May 14, 2010

Tag!!

Happy Friday Peoples!!  And with Friday comes the Just for Fun® color challenge!  This week Sandy challenged us to use the following colors:

Of course, my colors look NOTHING like the challenge!! REALLY!! I did try!!  And I just realized that I must be stuck in a creative mode.  I made another tag....with a silhouette.....and butterflies!!


Pretty straight forward on this.  Started with a vanilla shipping tag and pulled out the  Distress Inks. Shabby Shutters (that was my "lime" green) was sponged along the bottom with a touch of Mustard Seed.  Tumbled Glass was sponged along the top portion of the tag.  I stamped the Wildflower Silhouette from Just For Fun® with Walnut Stain and then did some generation stamping with the image to add the background shadows. The edges of the tag were distressed and sponged using Walnut Stain. The Small Butterflies were stamped on a first attempt tag (cough, cough) using Mustard Seed, Broken China and Walnut Stain.  They were cut out and adhered with rolled glue dots along the body only.  Tiny pearls were colored a light lime green with my copics and added to the bodies of the butterflies.  The sentiment "friends" was stamped along the edge with Broken China ink.  I paper pierced the flight trail and last but not least, the great fibers from my friend Melody completes the tag!

I think I am going to have to do another project with these colors this weekend.  BUT!! I need to try and stay more to the brighter tones of these colors!! HEY!! I should get points for not totally bailing out on the challenge! (Yes, I do try and justify my less than stellar creations).  Lucky for you all, there is lots of inspiration to be found from the other Just for Fun® team members!

And

Remember! You do NOT have to use Just for Fun stamps to play along (although, we'd love to see what you do with them, if you've got them!!).  Just link your creation on the Just For Fun Blog using Mr. Linky. 

Thanks for stopping by again today!  Remember to make time for some creativity over your weekend!

Wednesday, May 12, 2010

Life is like a Bicycle

Happy Hump Day, Peoples!!  Today is a busy day as I have to work and my kiddos have their spring music concert this evening.  BUT!! I've got goodies to share first!! 

Last night I got a peek at the sketch challenge on SCS and it got the creative wheels turning using some new stamps from Cornish Heritage Farms that have been waiting to see some ink. It's been forever since I've been able to play in one of the daily challenges!  I was able to get most of the card layed out late last night and finished it up this morning.  Lucky for me, I don't have to be in to work until a bit later, which gives me time to get this posted!!


I "expanded" the sketch to a square 5x5 card with SU's Kraft being the base layer.  I then made a slightly smaller Certainly Celery mat.  The Chocolate Chip layer was scored using my Scor Pal (kind of difficult to see in the photo.....my excuse is that that "photographer" has a very poor set up for late night or early morning photo sessions!). 

The "newspaper" layer was made using the wrinkle free distress technique with Distress inks in Tea Dye, Old Paper and Antique Linen.  This is my hands down favorite technique!! I LOVE the fact that I can make "designer paper" to match any project with just some ink and water!!  The Newspaper Ads scrapblock was stamped with Distress Walnut Stain.  The edges were distressed and sponged with some more Tea Dye.  The bicycle was stamped with Distress Walnut stain and clear embossed (which again, the photograph does not show!!) on a scrap piece of  "design paper".  The edges sponged with Tea Dye.  The sentiment (both  are from Bicycle Life) was also stamped with Walnut stain and again sponged along the edges with Tea Dye. The bicycle was matted on Chocolate Chip and Kraft. The sentiment was matted on Certainly Celery and Chocolate Chip. The striped layer is from My Minds Eye "Bud's Paper" (I've had it in my stash for a couple of years.  That hoarding habit finally paid off!) and was matted on a piece of Chocolate Chip.  Both the bicycle and sentiment are mounted with dimensionals. 

The final touches were to add the idea-ology "gears and "game pieces".  Dimensionals were cut and glue dots rolled to adhere those!! Supplies:  Stamps: Bike Life from Cornish Heritage Farms. Inks:  Distress Inks in Tea Dye, Old Paper, Antique Linen and Walnut Stain.  Papers:  SU's Kraft, Certainly Celery, Chocolate Chip, Very Vanilla.  My Minds Eye.  Accessories:  dimensionals, Tim Holtz's idea-ology, Scor Pal.

I have to say I absolutely LOVE how this turned out!! In real life the colors are rich and the texture from the different embossing techniques adds that extra "pop".  I think that this will be either the Toad's or my FIL's Father's day card!!

I'm headed off to work now.  Thanks for dropping by again today!! Remember to make time to explore some creativity!!

Saturday, May 8, 2010

If You give a PaperCrafter an Idea......

(my apologies to Laura Neumeroff, as I'm about to butcher her cute story lines!!)

If the girls at work give a PaperCrafter the task of buying a gift card for shoe shopping, she will go to the shoe store and pick out this card:


The card will give the PaperCrafter the idea to make a shoe shaped card.  The Papercrafter will look online for some ideas and find this REALLY cute template from Ellen Hudson.  The template will give the PaperCrafter the idea to tuck the gift card into a shoe that is made of  polka dot paper.  The PaperCrafter will have to go to her LSS (local scrapbook store) to find some similiar paper.  While at the store, the PaperCrafter looks at the card again and decides she will need to make a bow also.  This will mean that the PaperCrafter will now have to buy more paper and glitter to match the found paper. 

Once the PaperCrafter gets home and makes a mock up of the shoe, she will decide that giving ONE shoe is silly, so she will have to make TWO shoes ('cause, seriously....only Cinderella wears one shoe....and even she got smart by the end of the story and started wearing TWO shoes).  So the PaperCrafter will print, cut, and tape TWO shoes together (with hindsight saying she should have made the insole a different color, but I digress from the story!) and then get glitter EVERYWHERE while making the FABULOUS bows to complete the posh look of the shoes. Edited to add:  I made the  small bows by punching out 6  scalloped circles.  I ran them through my crimper several times, rotating the direction on each pass (to break down the fibers).  I then scrunched them up and smooshed the edges into glue that was glopped on a scap piece of paper.  The glue edges were then rolled into the glitter.  The flowers then were assembled with glue between each layer (although  you could hold them together with a cute brad too!!). The larger flower on the box was done the same way, but with the larger scalloped die from the Spellbinders nestie set and I think I used 8 layers versus 6. The smallest bow was made using the 3 flower punch from SU.


 The two shoes sitting on the desk look really cute but the gift card doesn't fit nicely inside the shoes.  That will give the PaperCrafter the idea to make a SHOE BOX (because ALL shoes come in a shoe box!!)
So the PaperCrafter will figure, measure, remeasure and still manage to cut wrong but finally complete the matching shoe box.  Then the Papercrafter will look at the top of the shoe box and see that it is lacking the COMPLETED touch.  So the Papercrafter will die cut, glue, glitter and make a matching fabulous bow. 

Then the PaperCrafter will look at the shoes and the shoe box and realize that there is still no card to hold the gift card or signatures of her fellow co-workers.  So the PaperCrafter will look at the scraps of paper, glitter and tape that are covering her work area then look at the clock and realize that she only has a short amount of time before she is suppose to take the "gift card" to work for the birthday lunch party.  The PaperCrafter will use the scraps on her desk to make a quick little card. 


Feeling very pleased with herself, she will take a moment to admire her handiwork and then realize that she really should take some pictures of it before leaving on the delivery task (or how else will all her faithful blog readers ever know of the creation?!!).


The PaperCrafter takes some so-so pictures and rushes off to deliver the goods.  When she gets home, she will see the glitter mess EVERYWHERE and start to clean it up.  She will see a gift card on her table and that will remind her that she needs to make a card for her mother in law.............
 
************
Supplies:  Paper:  Doodlebug Designs for DP, Purely Pomegranate, Pure Luxury White.  Inks: Purely Pomegranate.  Stamps:  None.  Accessories:  Art Glitter in Dubonnet, Chipboard letters (unknown), Scalloped edge punch, scalloped circle punch, Scalloped nestabilities circle, 3 flower punch from SU, big shot 

Friday, May 7, 2010

Birthday's ARE Good For You

Happy Friday Peoples!! The sun has decided to help everything bloom this week and with that, my allergies have decided to continue their blooming cycle  too!!  My noggin' has been either stuffed up beyond thinking or in la-la land from medication.  Needless to say, I decided to keep things pretty CAS for this week's
 Just for Fun® Friday Color Challenge.  This week Sherry found the color inspiration from Distress Inks:


If you are a regular reader of this blog, you know that I LOOOVE Distress Inks!!  But!! Guess what?!! I did NOT make them the focal of this card!! BWHAHAAAA!! Last week, when I was slightly confused as to what the colors were, I had picked out some design paper from Basic Grey's Mellow line.  I decided, in my fogged induced creating, to let the paper do all the work for me:


I have a square 5x5" base of SU's Wild Wasabi with a slightly smaller layer of Tangerine Tango as the mats for my Basic Grey Mellow dp.  I then cut the middle strips using the same colors.  I cut and embossed a piece of vanilla cardstock with my classic rectangle Nestabilities. While the paper was still in the die, I lightly sponged the inside with Scattered Straw Distress Ink, not really caring to get smooth, even coverage, as I was trying to mimic the yellow on the design paper.  I then used my stampamajig to stamp the sentiment from
Just for Fun (E2964) in Spiced Marmalade Distress Ink.  The sentiment was matted on a piece of Cool Caribbean that was die cut using the scalloped rectangle Nestabilities and lightly sponged along the edges with Tumbled Glass Distress Ink.  To finish, I found these buttons from SU's retired Playground set that matched PERFECTLY.  They are "fauxed" sewed~~meaning I sewed the thread through the loops, but they are attached with glue dots as it would seem the druggie creating this adhered her strip to the card before attaching the buttons!  *for those of you who will say I failed in my design layout as I did not stick to the "rule of three" in my embellishments, here is my lame argument as to why this rule needed to be ignored in this particular instance:  Yes, three small buttons TECHNICALLY do fit on the strip.  But!  To my creative eye,  it looked like I was cramming three buttons on a strip that was too small.  And, I did not want my strip any larger.  I liked it the size it was.  Soooo, I decided that if everyone stuck to the rules, we would all be in the same little boring box of creating and what was the fun in that?!!  I TRUELY hate when people tell me how to do creating "the correct way".  There is NO correct way!! Creating should be from YOU.  What YOU like.  What appeals to YOU*   Sorry.....I will get off my little soap box now and just say that I LIKED the two buttons best and so that is what I went with!

****
Edited to add the NEW LINK!! Yippee!!  Just for Fun is now located HERE!! 
A little technical note here:  I usually try to link directly the stamps that I use in my projects.  Well.....bad news/good news!  I could NOT link today as I was writing this up (Thursday) as JUST FOR FUN STAMPS® IS GETTING A NEW SITE!!  Yep!! How exciting!! I can't wait to see how the new "store" looks!! The new site should be LIVE as of today (Friday) but my crystal ball is currently in the shop and I cannot say for sure that all went according to plan! And we all know that construction RARELY goes just as planned!  I will try and update the links later so that you can enjoy the new site!
****
But!! In the mean time, I hope you will find the time to look at the wonderful inspiration that the other DT members created!
                                                                     Sherry Cheever
and

Thanks for dropping by again today!!  I'm hoping to have another project for you tomorrow (if "construction" goes as plans!! hahaa!!).  Remember to take some time for creating!!


Tuesday, May 4, 2010

Is it Friday YET?!

Morning People!! I cannot believe it is only Tuesday!! I feel as if it should be at LEAST late Thursday, LOL!!

I spent Sunday touring the Pasadena Design House with my mother-in-law (sorry, no pictures allowed!).  The design house is a fundraiser for the arts.  The committee decides on a local historic house, mansion or new construction to "design" with the lastest and best.  A group of designers are chosen given their presentations on what they would do with a given color scheme and somewhat a theme to a certain room. Each chosen designer is then assigned a room (or hallway, ceiling, garden area) to redecorate.  There are some WAAAY over the top designs as no surface is left untreated!!  This year the house was not quite as over the top as it is used by the Red Cross as offices, so the "homeowners" won't be purchasing the upgrades or home decor.  Still, it is always fun to get some new ideas (this year will probably cost the Toad the patio cover!)

*****************
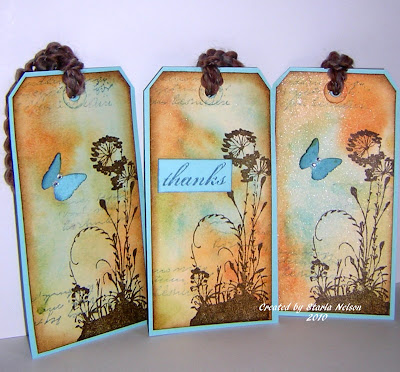
Yesterday I REALLY needed to put something together for Teacher Appreciation Day (which is today).  But as luck would have it, my allergies decided to kick in with the light winds and the blooming flora.  Let's just say that Mojo decided to go into hiding somewhere in the stuffed up cranium!! With the help of come cyber friends, I finally decided to quit fighting the fact that I would not end up in the papercrafters hot spot if I went a bought teacher gifts versus made them. I ended up buying some Herb Window Sill plants that came with three different herbs, the biodegradable pots and the wooden crate to hold them.  I even gave serious thought of buying the cards (GASP!!), a sure way to end up burning, but I kind of redeemed myself by finding enough mojo late last night to make the tags for the gifts. 

The original idea was to use the Faux Bleach technique with distress inks.  So I embossed my tags, picked out distress inks in Crushed Olive, Tumbled Glass and Rusty Hinge and discovered that it is possible to have colors that will not show up the Faux Bleaching!! No big deal. Didn't really care for the shade of Crushed Olive for what I had in mind. Got out three more tags, and switched out the Crushed Olive for Peeled paint and went with the wrinkle free distress technique instead.  I was applying two to three different layers of color when I got interrupted on the last tag and discovered that I liked ONE layer of color better!! Sooooo, repeat the first two tags until I FINALLY got the three tags with a background of color I liked! I then spritzed the required (hehe) Tattered Angels Glimmer Mist in Antique Linen over the background.

The Brushed Wildflowers is from Just for Fun Stamps®.  This image is one of my favorite images in my stamp collection! I love the lines and it just lends itself for tags or those CAS projects!  I stamped the image with distress Walnut Stain.  I then inked up the Background Block script from Just for Fun Stamps® with distress Stormy Sky, stamped off once and randomly stamped portions of the image on the tag. The edges of the tags were then sponged with distress Vintage Photo and the entire tag was adhered to a piece of SU's Cool Carribean cardstock.  The cool fibers were a RAK from my friend Melody.   Here are some close up pictures of the two different style of tags.


My oldest son is soon to be 13.  He was not sure about the butterfly as being masculine enough for his male teacher so I swapped out the CUTE butterfly for the simple Thanks (SU's Much Appreciated) and stamped it on a scrap piece of SU's Cool Caribbean with distress Stormy Sky.  The edges were sponged with more Stormy Sky and the sentiment was adhered with dimensionals. 

The butterfly was punched with Martha Stewart's butterfly punch from Cool Caribbean and was spritzed with Tattered Angels Glimmer Mist in Frost.  I then added the rhinestone accents to the body and used a rolled up glue dot to adhere just the body to the front of the tag. 

The herb sets were wrapped in kraft wrapping paper and had more of the fibers winding around it.  The tags really popped off the craft with this color combo. 

Ok....I need to head back to the school to make sure the catered lunch for the teachers gets set up in the right place!!

Hope you all have a wonderful, creative day and thanks for dropping by again!!