Wednesday, February 29, 2012

Marbling Faux Many Ways

Hey People!  The E-Team is gathering again today to bring you another technique hop!  Today, the different E-Team members are showcasing Faux Marble!!

Of course it wouldn't be an E-Team blog hop without some blog candy!!  Daisy will chose random TWO winners from comments left between today, February 29, until March 2, on the E-Team members blogs.  The two winners will  receive a $25 eP gift certificate! 

The E-Team
Me
Linda L--couldn't play along today, but make sure you drop by and let her know she was missed!
The winner's will be announced on the eP blog Monday, March 3!

OK!! Let's get this Faux Show rolling!!


Today I'm going to show you several variations on how you can achieve a Faux Marble.  I must admit I got a bit carried away with playing! 

First up:  This is what I call Distressed Faux Marble.  Step One:  smoosh Distress inks of choice randomly on your craft mat. I just smoosh block and lines here and there.   Spritz with Tattered Angel's Glimmer mist until ink beads up. Place your paper (I used Pure Luxury Ivory in this sample) down in the beaded ink.  Lift, dry.  You have now completed my version of the Wrinkle Free Distress Technique. 

wish I could have captured the shimmer!! Drat these dreary days!

Tear a piece of scrap paper.  Grab your sponge dauber or stencil brush, a couple of Distress Inks in complentary colors and apply the ink along the torn edge of the paper to your background.  Try to avoid making letters with your lines (such as "Y", "T", "K") as they are not natural in marble!!


I used a combination of Distress Brushed Corduroy and Vintage Photo for the lighter brown lines.  The dark brown lines are Tattered Angle's Glimmer Mist in Tattered Leather.

I have to say I LOVE how this turned out!  I must admit that I stared a this forever trying to come up with a project that wouldn't hide the effect, LOL!  Alas, I failed to come up with anything today, but keep an eye out for this, I'm mulling over some ideas!

Ok...next version of Faux Marble.  Now, this is something that I found on Andy Skinner's blog.  He came up with a faux marble technique that he calls Alcohol Floating Backgrounds.  His technique combines alcohol inks and water.  You can see his video here.  WARNING: THIS TECHNIQUE IS VERY ADDICTING!

Begin with a tub of water and some alcohol inks. 


Drip two/three drops of each of the alcohol inks into the water


Slip your paper of choice into the water


Out comes some fabulous backgrounds!!
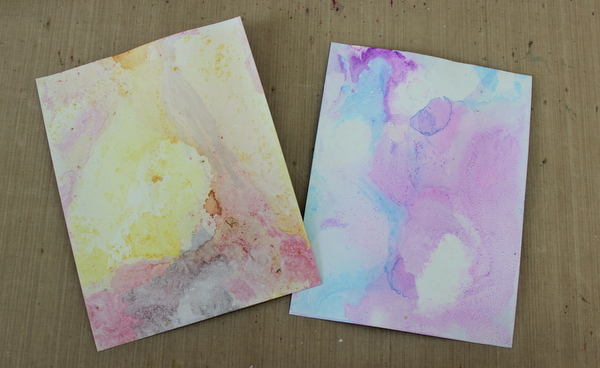

Front side


BACK SIDE!!  YEP!! You get two different backgrounds on each sheet!!  This lets you choose which side you want to work with!!


Different colors on shipping tags

On Pure Luxury Cardstock
NOTE the middle sample...that one will be used for my project!!


On Glossy Paper


Slight variation.  Spritzed glossy paper heavily with water.  Applied alcohol inks with ink applicator. 

I also did samples with the alcohol ink Snow CapIt added a cool effect, but I found that on the glossy, it clumped up and then just brushed off once dried. Still a variation!! 

For the most part, I could make one sample, add new colors for another sample before needing to dump my water and starting over. 

I also tried this technique with some sticky back canvas. I wanted to try to make a background that was complentary to the middle sample seen above on the Pure Luxury.  Funny thing, I actually liked the PAPER backing of the canvas better!! haha!   And this is what I came up with using the Alcohol Floating background. 

This is an 8.5 x 8.5" layout.  the papers are retired Stampin' Up (Sorry, I don't recall the specific paper names and will admit that I'm too lazy and too far behind schedule in trying to get this posted!)  The main base was scored using my Scor-Pal every 1/4".  The backing to the sticky back canvas makes up the second background piece.  Tip:  Tape will NOT adhere to this backing! I had to put the tape on the black layer and then applied the background.  My guess is that if I could pull it up easily.  If I was really wanting this to stick, I would use some glue (either hot glue or strong glue like E6000.

The Suzi Blu image was stamped twice with Memento Tuxedo Black ink.  I stamped it on a piece of Pure Luxury White and again on the Alcohol Floating background that was seen previously.  I paper pieced her dress using the background.  I added a very slight bit of shading to her dress and hair with some Copic markers, but deliberately left her body uncolored, as I liked the stark, rather gothic look to her!

The roses were made with more of the retired SU papers.  Ok, I felt guilty.  I'm taking a wild guess here:  Lovely Lilac, Lavender Lace and Almost Amethyste would be my guess on which shades of paper I used.  The large roses were die cut with Spellbinder's Spiral Blossom One.   The small rose was made from a Spellbinder's Scalloped circle that I just hand cut the spiral to roll.  The large flowers were stamped  and sponged with Distress Inks in Dusty Concord and  Chipped Saphire, using stamps from Wendy Vecchi's Art Colors Life and Be Happy, Make Art sets.  The leaves were die cut from SU's Kiwi Kiss using Spellbinder's Foliage and were sponged with Distress Peeled Paint ink.  The pearls in the center were made with a Viva Decor pearl pen.

The edge embellishment was cut with Spellbinder's Edgeabilities Classic Ric Rac.  The black rhinestones are from Want 2 Scrap nestabling that match Spellbinder's circle dies.  I just cut them to fit the area I wanted to place them in.

Close up of the Faux marble on the dress and flowers


I hope that these variations of doing Faux Marble will inspire you to create!!

'Till next time...................


Tuesday, February 28, 2012

Saturday versus Today

On Saturday I was lazy and slept in until 7:30 am.

Today I got up at 5:50 am. 

Saturday I woke up to blue skies and sunshine.

Today I woke up shades of grey and white.


Saturday I went for a long walk wearing short sleeves.

Today I bundled up in long sleeves, pants and my mountain hardware jacket to take some quick photos.


On Saturday I considered doing some spring planting.

Today I feel sorry for my plants.


On Saturday I opened up all the windows to enjoy the fresh air.

Today, I'm thinking that sitting in front of the fireplace sounds good.

On Saturday the sun shone bright.

Today the sun is starting to reflect off the snow.


Saturday, February 25, 2012

Inspired Thanks

Happy Saturday!  I hope that you are enjoying the weekend.  It is GORGEOUS weather here!!  I enjoyed an hour long walk this morning (with short sleeves!!) and have the windows open!  Ahhhh!! You can't beat Southern California weather this time of year!!

I needed to make a Thank You card for the Oldest Kiddo to give to his optometrist.  It would seem that said Kiddo threw his back pack one too many times and somehow smashed his glasses to smithereens, despite having them in the case. Well, his optometrist just so happens to be the father of one of Kiddo's classmates.  He graciously took the Kiddo's glasses into work with him and replaced the lenses, saving me a drive.

The Inspiration Challenge on SCS today was perfect to get the creative gears grinding.  Today's inspiration site was the Galleria Arts and Crafts in Calgary.  I found this Raku pottery plate as my inspiration


And here is the card that I came up with from this inspiration


Card base is (?) SU's Not Quite Navy and is 4 3/4" x 5 1/2" with the corners rounded on one side with my Zutter 1/2" corner rounder.  I embossed a piece of brushed copper card stock (from my stash) with Sizzix Texture Fade Sheet Music.

For the main image, I started with a piece of Pure Luxury Ivory card stock and made a masked for the "moon" out of scrap paper.  I then randomly squished (that would be the technical term) Encore metallic copper ink on the paper.  I then applied Distress Stain in Broken China twice, drying between layers with my heat gun. I then used some Distress Ink in  Faded Jeans to darken the blue areas even more.  Everything was then spritzed with Tattered Angel's Glimmer Mist Abominable Snowman. 

The heron is actually a line stamp from Just for Fun Stamps. I stamped the image and then used a black marker to fill in all the open space.  I then free handed the grasses around the heron. 

At this point I totally messed up my outline of the moon.  Soooo, I cut out another "moon" lightly sponged it with Distress Broken China ink and adhered it over the previous moon.  This meant that I had to use my stampamajig and re stamp the heron. Sigh....

The sentiment is from Stampin' Up (?) All Year Cheer.  I stamped it on a scrap piece of Pure Luxury Ivory with Ranger's Archival Ink in Jet Black.  I rounded two of the corners, lightly sponged more Distress Broken China along the edges and adhered. 

This is a little different than my usual, but I rather enjoyed going a different path!!  Sometimes it's good to get off the beaten path!!

I'll be back later this week with the E-Team!!  We've got another hop in the works for you!!  'Till then.....

Sunday, February 19, 2012

Measuring Life

Hey People!  I'm excited to be posting today as a guest designer for the CAS challenge on SCS!  Today's challenge is to use stitching or faux stitching in our projects.

Now, it just so happens that I'm deathly allergic to sewing (my aplogies to my Home Ec teacher, Ms. D.).  While I can sew on a button, It will usually take me several months to get that chore done.  So, rather than keep everyone waiting, I went with the faux stitching!


  The Toad thinks I failed this challenge as I added embellishments. Personally, while I liked the card with just the sentiment panel, I felt that the flowers added bit of needed color. 

The card base is 4 1/4" x 5 1/2" Pure Luxury Ivory.  The sentiment panel is also Pure Luxury Ivory that I distressed the edges and inked first with Distress Antique Linen, then along the edges with Distress Vintage Photo.  The sentiment is from TenSecondStudios stamp set Life, which was stamped with Distress Gathered Twigs.  I just randomly poked holes along the edges with a needle and faux stitched with a SU Creamy Caramel marker.

The rolled roses were die cut with Spellbinders scalloped circles out of My Mind's Eye Madison Avenue.  I free cut the spiral and inked the edges with Distress Victorian Velvet before rolling the roses.  The leaves are Sizzix's Branch with Leaves die and were cut out of Basic Grey's Sweet Threads. 

A shout out to the weekly CAS DT gals for allowing me to be a guest designer this week!! Thanks girls!!

Well, I'm one of the unlucky ones who had to go to work today, but I hope that you get an extra day of creating!  'Till next time................look for moments that take your breath away today!!

Saturday, February 18, 2012

There is a Reason God Gave Me Boys

Today started out good.  The Toad and I began our day with a walk with some friends.  Then I came home and started working on a card that the Oldest Kiddo needs for a birthday party for one of his classmates tomorrow.

Did I happen to mention that this classmate is a girl?  A 14 year old girl?

Just in case you are new to my blog, allow me to introduce my family.

The Toad....the man who graciously puts up with my crafting and (even though he will deny it, encourages me to try new creative outlets)

My two BOYS:  Oldest Kiddo and Youngest Kiddo. 

The dog.  Also of the male gender. 

And of course, there is always an extra friend (or two or three) present too.  Also, 99.9% of the time male. 

Needless to say, I am surrounded by testosterone.  Which is fine.  I'm use to it and I have never been what I consider a "girly girl", so most of the time I can just roll my eyes at them and retreat to my own little crafting room when the testosterone levels get too much for even me to handle.

But my testosterone filled world has created a rather difficult problem for me.

I have NO IDEA how to make cards for 14 year old girls.  And the only help the Oldest Kiddo would give me was, "well, she's not really girly, she likes the 80's  and Kevin Bacon".  Thanks Son.  I'm kicking myself right now that I didn't order that stamp set,  "9 degrees from Kevin Bacon". And to top it all off,  the first card I suggested got the wrinkled up nose and the "nahhhh....I don't think so" response.  Great.  Now I have to come up with a card that is not only for a 14 year old girl, but it now has to be a card that my 14  year old son isn't embarrassed to give her.  NO PRESSURE. 

After spending countless minutes (I refuse to acknowlege the possibility that those minutes turned into an hour or more) cruising the web for "teen" digital images that I thought I might be able to use, countless galleries, images from different stamp companies, challenge blogs and even Pinterest, I finally came up with a card on my own. 


 Base:  5 1/2" square of Pure Luxury White.  Mat of SU's Kiwi Kiss.  Design paper is from Creative Imaginations "Loolah" that I was lucky to get in a class kit at CHA.  The butterfly punch is Martha Stewart.  Die cut sentiment uses Cuttlebug's Olivia dies.  A Quickie Glue pen adhered the black mat to the letters and the sentiment to the layout.  The rhinestones on the butterflies, explanation dot and the center of the flowers are also from Creative Imaginations and were found in the same class kit. 

The Oldest Kiddo deemed this "cool", which I take to mean that he won't be embarrassed to give it to the birthday girl. 

Feel free to leave me any ideas for girl cards.  I'm afraid that this won't be the last one. 

'Till then.......

Tuesday, February 14, 2012

The Terrible, Horrible, No Good, Very Bad Crafting Day

How many of you have read Judith Viorst's Alexander and the Terrible, Horrible, No Good, Very Bad Day?  It's about a little boy who has one of THOSE days.

How about Starla and the Terrible, Horrible, Really?! Are you kidding Me?!!  What Else Can Go Wrong Crafting Day?!!

Haven't heard of it?  Seriously?

Sit back.  Let me tell you a (short) tale.

The Youngest Kiddo still gives Valentine treats in his classroom.  Of course, I always suggest going over the top and making some cute treat that the classmates probably don't even notice while tearing off the paper.  Well, the girls probably notice.  They are at that age.  This year, no different.  I found this cute idea on Pinterest (my lastest obsession). The Youngest Kiddo and I started late Sunday evening getting all the pieces together.  He die cut circles, and scored lines while I cut paper.  While he was at school Monday, I assembled the treats while getting a sugar high from eating so much chocolate.

I waited to make the tags until he got home from school.  I didn't know exactly what he wanted to do, and this is the Kiddo who definitely has an opinion on such things.  While he was finishing up his homework, I got busy with the computer portion of the tag.

This is where the Terrible, Horrible, No Good, Very Bad Crafting Day begins.

First, I started with trying to make the sentiment in PSE (photoshop elements).  Did you notice the little word try? I have no idea what I clicked on, but despite having a rather large font size, my entire sentiment was printing out at less than an inch.  Fine.  I switched over to plain ol' Word/Works, whatever.  Get everything how I want it.  Copy and tried to paste onto another column.  Got the top one done in the second column. Then things just went wonky and would NOT line up in the second column. 

DEEEEP BREATHES.

Tried to print out the sentiment onto colored SU card stock, which usually my printer has no problems with.  After jamming the printer four times, the Kiddo and I decide to print out on white card stock and just mat the sentiment onto colored card stock. Put in the white card stock that I always use and hit print.  My stupid printer kept spitting it out and printing on the regular print paper!!  

DEEEPER BREATHES. 

Ok.  I am now beyond frustrated.  We die cut the regular copy paper sentiments and then I trace and cut around the outside of the die for just a slightly larger colored mat.  17 times.  The Kiddo and I tag team the taping of the copy paper to the colored mat.  Kiddo punches holes for some twine.  I tie bows. Kiddo sticks sentiments onto treat.  The cheap, double sided tape doesn't stick well.

I don't care.  I tell the Kiddo to just stick them on again as he hands them out. 

Despite the Terrible, Horrible, No Good, Very Bad Crafting Day, I really think the treats are cute.  And since you patiently read the entire saga (or pretended too) here is a picture of the treats themselves!!

Rolo candy covered in SU Summer Sun that was cut 4 1/4" x 3 1/4" and trimmed with Antique decorative scissors.  Score lines made ever 1/4".  SU Cameo Coral paper for the eraser.  Small Spellbinders classic circle for the top.  Good ol' kitchen tinfoil for the eraser band.  Hershey Kiss, with tag removed for the pencil lead.  Everything (but the sentiment!!) stuck on with Scor-tape. 


I'm hoping that all the Terrible, Horrible, No Good, Very Bad Crafting Day vibes are gone today.  I need to make the vegetarian version of Pigs in a Blanket for the class party.  I REALLY don't need to have one of THOSE days in my kitchen!! haha!!

'Till next time......hope you have a GREAT creative day!!

Wednesday, February 8, 2012

Tooting My Own Horn (but I added a tutorial!!)

Hey People! Hope your week has started out well!  The Oldest Kiddo's JV basketball team (which is coached by the Toad) had back to back games on Monday and Tuesday but walked away undefeated in league! WooHoo!!  Last night's game was an away game and the boys convinced the Toad that they should stop and eat on the way home to celebrate.  So, I'm a tad late this morning getting this post up!!

Back in August I was asked by Papercraft Inspirations Magazine if I would consider being a contributor for their Masterclass article in issue 95 (January issue).  Let's just say I'm amazed I was able to type Yes, thank you! with all my hootin' and hollerin!!


I actually had TWO cards published in this issue.  Today I'm going to share the Thinking of You card that was highlighted for the technique, versus the entire card.


Supplies Used:  Paper Gina K's Pure Luxury Ivory.  Basic Grey's 6x6 Sweet Threads. Stamps:  Hero Arts Stitched Frame. Inks:  Distress Ink Gathered Twigs.  Accessories:  TenSecond Studios Kiss Me Pink and Poison Ivy metal, mat set, Teflon refiner and decorative wheel.

And as an added bonus, the step by step!!


                                Using Stazon Ink, stamp your image onto the front side of the metal

Place the stamped metal face up on the acrylic mat and trace around the image with the Teflon refiner.  You could also use a stylus.


Place the metal stamped side down on the thin acrylic mat.  Use a paper stump and stylus (or ball and cup tool) to puff out the image

Still on the thin acrylic mat, use a decorative wheel to add detail


Use the pointed tip Teflon refiner to add "scribbles" between the petal lines

Cut out the flower and leaves (which were done the same up through step #3).  Using a sanding block (aka a burnishing block) lightly sand off some of the raised portions on the leaf to give highlights.  You could also sand the flower petals to highlight the "scribbles", but I wanted a more subtle texture, so I chose not to sand the flower.

Stamp stitched frame onto decorative paper.  Stamp sentiment onto scrap piece of Ivory card stock and distress edges with scissors or distressing tool.  Ink edges with Distress Gathered Twigs.  Adhere flower and leaves with strong glue dots, Humungo sticky tape or hot glue.

  A few notes on the flower:  I cut out two layers, but the bottom layer I did not add the decorative scribbles or lines.  I liked the look of the contrast between the layers.  You can gently form the petal leaves with your fingers to give shape to the flower. 

When adhering metal to metal, I like to use E6000 glue, Humungo Killer adhesive (link above) or a hot glue  gun.  I find that these work best for keeping the metal on metal adhered.  For adhering metal to paper, strong glue dots or the Humungo sticky tape work fine. 

That's it for me today!  I'll be back in a day or so with the SECOND card that was published!! (insert cheesy grin here_________).

'Till then..................

Saturday, February 4, 2012

CHA Update

Hey there People!  I thought I had better pop in before someone sent out the Search and Rescue team to find me!

CHA was a blast!  Daisy was the ultimate hostess and treated us to a luxury weekend at the California Grand Hotel and a wonderful tour of Disneyland.  Sherry and I ended spending the afternoon exploring Disneyland together until our feet demanded we head back to the room before a FABULOUS dinner at Club 33 with all the E-Team plus a long time friend of Daisy's.  I finally got to meet E-Team members Linda Ledbetter and Linda Duke for the first time!  Let me just say that Linda L is as cute as I thought she would be and I'm sorry that her class schedule prevented us from spending more time together!  Linda D is a RIOT!  I ended up walking most of CHA with her and had fun being in the shadow of stamping royalty!!

You are probably wondering where are all my pictures of the new product coming out.  Uhhhhh.  Let me explain.

This year, I did a lot of meeting people in the industry (one of the perks of following Linda D and Sherry around).  And I'm not the type to ask for photos with them.  Not that I wouldn't love photos of these creative icons, but mostly because that would mean I would have to have my photo taken.  And I HATE my photo taken.  Yes, I know.  I need to get over that.  But that didn't happen this past weekend! haha.

Let's see if I can remember who I met:

Karen (imastampin on SCS) and Wendy (wendybell), who were both in the original challenge chasers group way back when I first joined SCS.

The wonderful duo of Stacy and Jeff, owners of Spellbinder's.  And I got to say a quick hello to Heidi Blankenship   , who I was on a previous design team with in the past.  And the absolutely adorable Juliana Hudgins.  I have to say that her new dies from Spellbinder's are something that I originally didn't think I would use, but after seeing them in the various projects the Spellbinder's design team came up with, and working with the die at Juliana's make and take, my mind was racing with different ideas for them!  As soon as I save some pennies, these dies are going to come live with me!!

I also met Donna Salazar.  She also has some new dies out with Spellbinder's and are also on my wish list.  I'm afraid I may have to start working more to afford all of these dies that I want from Spellbinder's new release!!

Then I got brave and begged the incredibly talented Wendy Vecchi to please, please make the different modeling films in her art parts line on a roll.  I would love to use that stuff for "sculpture" ideas floating in my head, but don't want the limitation of the size of the sheets. 

And the grand dame herself, Suze Weinberg.  I got really brave and stopped Suze when she was passing by me.  She was so nice!  She was very encouraging in my growing interest in making jewelry and using wax as a medium. 

As far as products, I went off the paper craft trail and did some exploring of other booths.  I have been finding myself wanting to explore more mixed media type creations and wanted to see what was out there.  Let me tell you, there is sooo much out there to spark your creativity!  I want the ENTIRE line of Viva Decor products.  I played around with some ArtDeco paints for glass and fabric (which I also want).  Then there was the Ice Resin booth.  Oh yes!  I'm going to get my desk top cleaned off so I can start pouring!! And there were other companies creative paints and molding compounds that I need to look into more.  Very cool stuff. 

And no pictures.  I'm such a bad blogger!  I was just caught up in the products and asking questions that pictures were forgotten.  One of these days I'll get it all together!!

I will be patting myself on the back as well as tooting my own horn in my next post.  I even have a tutorial to go along with all the self congratulating!!  'Till then.........